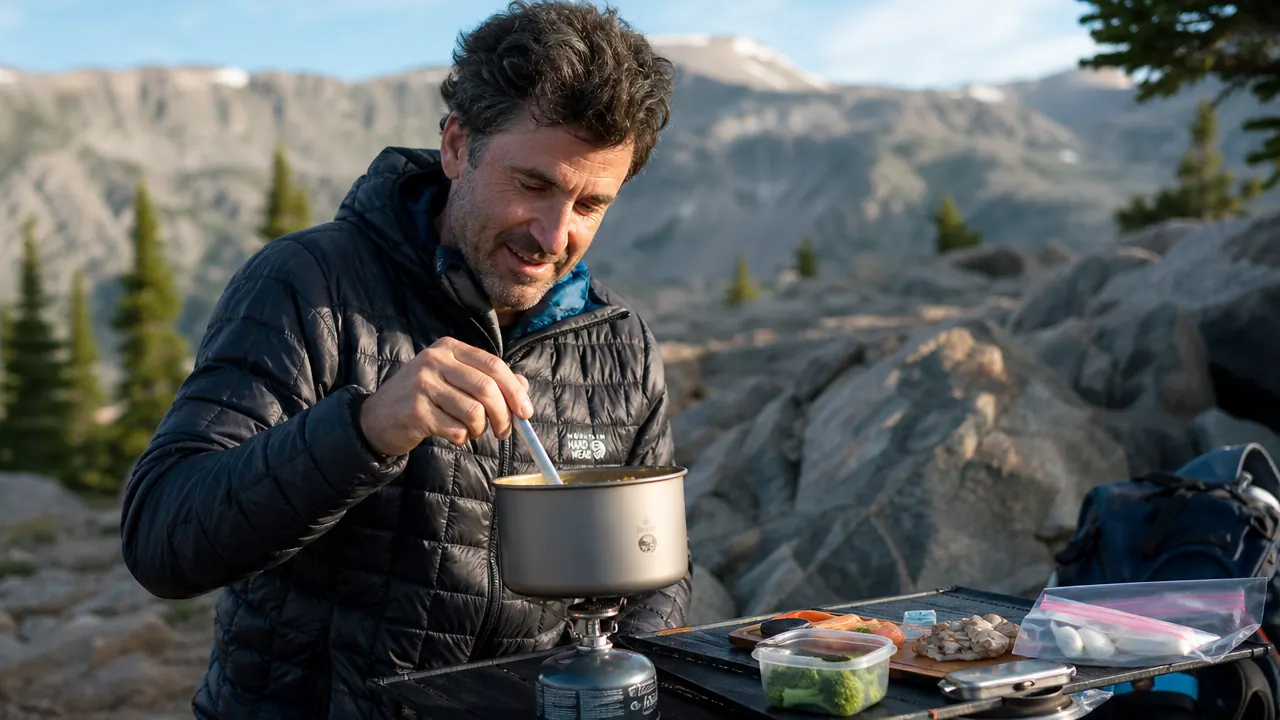
I've watched too many first-time backpackers boil water for a sad packet of instant noodles every night and quietly wonder if eating well on the trail is just something gear nerds do on YouTube. It isn't. I've made shakshuka, one-pot pasta with sun-dried tomatoes, and proper oatmeal with brown sugar and dried berries, all on a stove that weighs 2.6 ounces and fits in my shirt pocket. The barrier isn't the stove. It's not knowing how to plan around one.
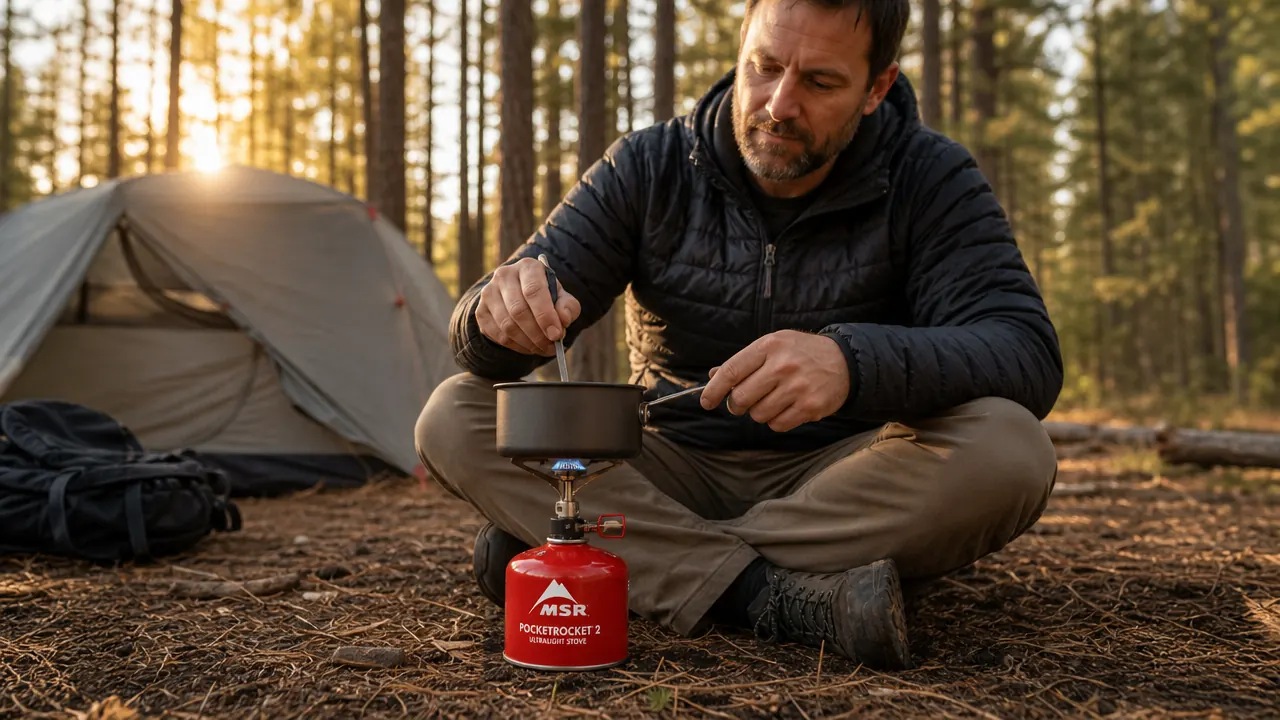
The stove I use for almost everything is the MSR PocketRocket 2. I've run it through three years of weekenders, two week-long trips in the Cascades, and more car-camping setups than I can count. It's not the cheapest option on the shelf, but it's the one I reach for without thinking. Fast boil, reliable ignition, predictable flame control. Once you own a stove you can trust, meal quality is just a planning problem, and planning is easy once you know the steps.
If your current stove is fighting you, it's costing you more than money
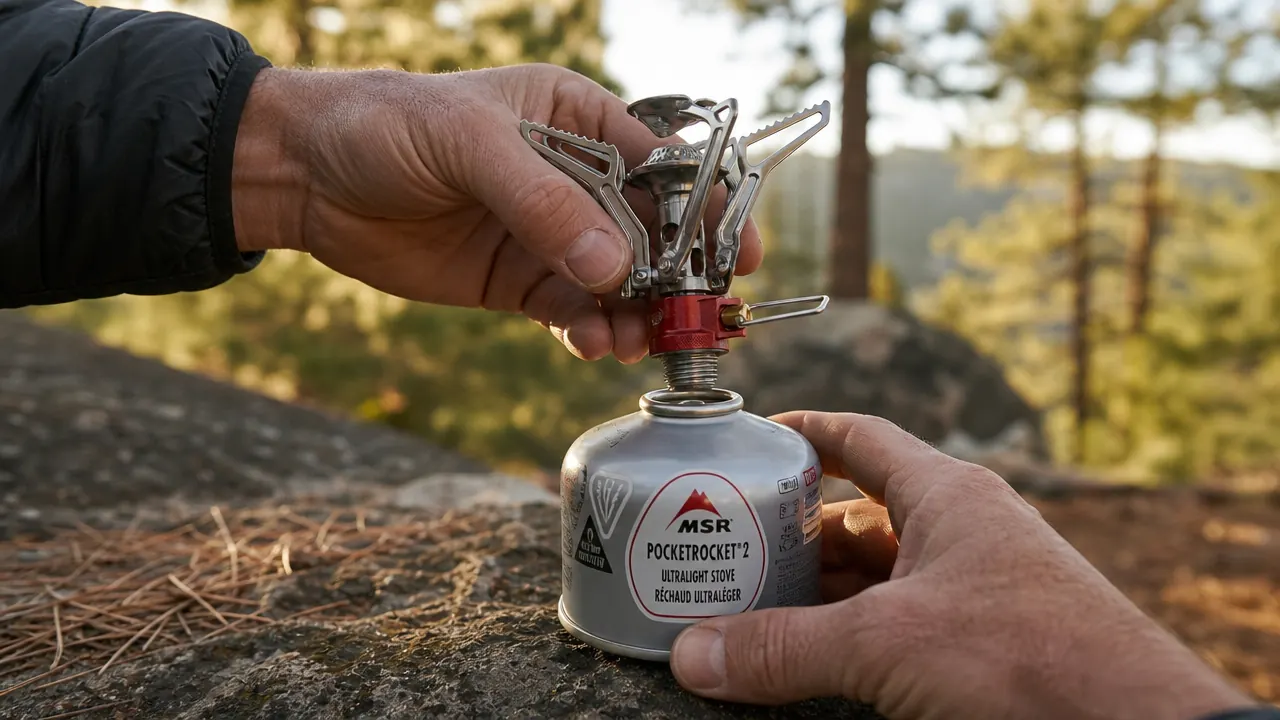
The MSR PocketRocket 2 weighs 2.6 oz, boils a liter in about 3.5 minutes, and runs on standard isobutane canisters you can find at nearly any outdoor retailer. It's the stove I'd hand to a friend before their first overnight.
Amazon Check Today's Price on Amazon →Step 1: Pick Your Stove System Before You Plan a Single Meal
Everything downstream, fuel estimates, cookware choice, even which recipes you can pull off, depends on the stove you're using. Canister stoves like the PocketRocket 2 work best for backpacking and car camping where weight and ease of use matter. Liquid-fuel stoves are for mountaineering in sub-zero conditions. White gas stoves are heavy and messy. For 95 percent of campers reading this, a canister stove is the right call.
The PocketRocket 2 uses standard isobutane-propane canisters (MSR, Jetboil, and most generics all work). The burner screws directly onto the canister, which also acts as the stove's base. That's it. No priming, no pump, no separate fuel bottle. Screw it on, open the valve, hit the lighter. You're cooking in under 10 seconds. Flame control is genuinely good for a stove this small, which matters when you're trying to simmer something without scorching the bottom.
Before you buy a stove, confirm it fits your canister brand. Almost all backpacking canisters use the Lindal valve standard, so compatibility is rarely an issue with name-brand stoves. Cheap knockoffs sometimes have inconsistent threading. With the PocketRocket 2, I've never had a threading or sealing issue across a dozen different canister brands.
Step 2: Plan Meals by Fuel and Water Needs, Not Just Calories
Most backpacking meal guides tell you to count calories. That's fine for nutrition, but it misses the real cooking variable: how much fuel and water each meal burns through. A freeze-dried meal that rehydrates in a sealed bag uses almost no fuel because you're just boiling water once. A pasta dish simmered for 10 minutes burns through significantly more. Planning your fuel load without accounting for cooking method means you either carry too much or run out on day three.
My rough field rules: a standard 100g canister (the small ones) handles about 3-4 days of breakfasts and dinners if you're cooking simple meals and not running the stove for more than 8-10 minutes per meal. Bring a 230g canister for a week-long trip with two people, or if you're cooking more involved recipes. When in doubt, go one size up. Fuel is light and canisters are cheap. Running dry miles from a resupply point is not fun.
Also map your water sources before you leave. You need water for cooking, not just drinking. If you're camping in the desert or above treeline in a dry spell, factor in carrying more water, which adds weight. In the Cascades, I rarely worry. In the Colorado high desert, I plan every meal around how little boiling water it needs.
Step 3: Prep Ingredients at Home to Cut Cook Time at Camp
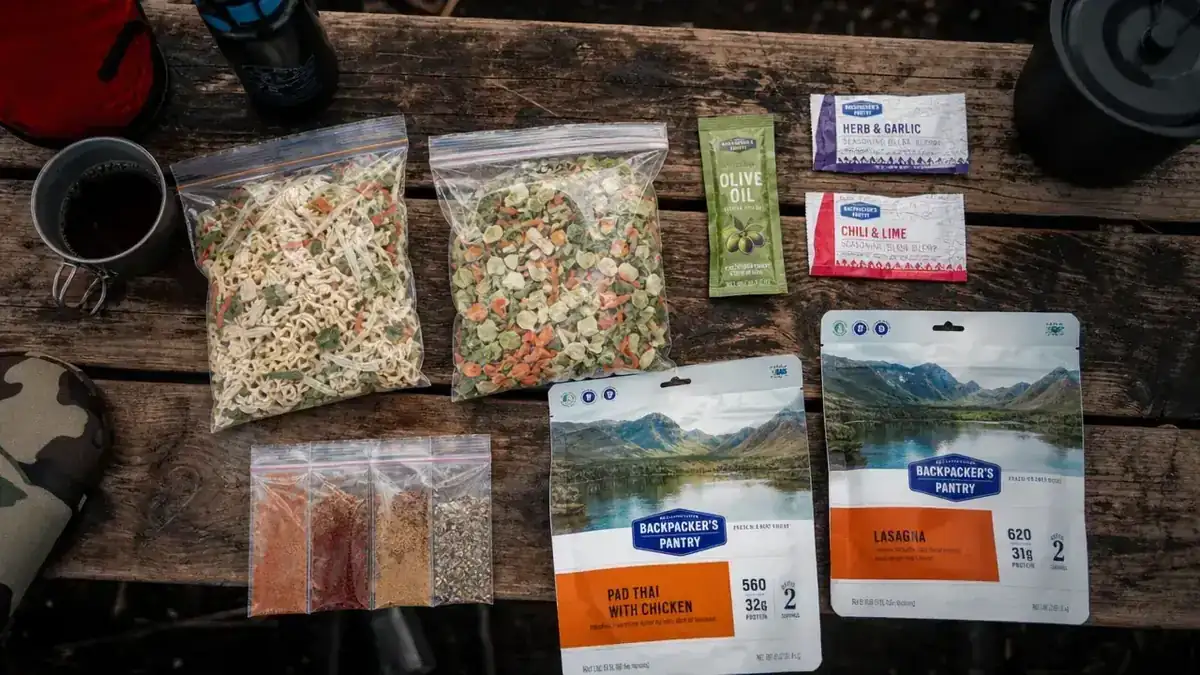
Here's the shift that changed everything about my trail meals: most of the real cooking happens at home before you leave. Dice and dehydrate your own vegetables. Pre-measure spices into small zip bags. Cook and crumble ground meat or turkey at home, dry it thoroughly, and bag it. At camp, you're mostly rehydrating and assembling rather than cooking from scratch. The stove just provides heat.
Some of my go-to home preps: pre-cooked and dried quinoa that rehydrates in 5 minutes, sun-dried tomatoes packed with olive oil, instant mashed potato flakes with dried milk and butter powder mixed in, and single-serve packets of nut butter for quick breakfasts. Combine these with a canister stove that heats fast and you can eat meals that feel genuinely good, not like sad survival rations.
If you don't want to dehydrate your own, the freeze-dried meal market has gotten genuinely good. Mountain House and Backpacker's Pantry have options that require just one boil. Still plan them out ahead of time so you know your water and fuel needs per night.
Step 4: Set Up a Stable Cook Station Before You Light the Stove
A canister stove sits on top of its fuel canister. That makes the whole assembly top-heavy, especially with a full pot of water. I've knocked over more trail meals due to bad cook station setup than for any other reason. Find a flat, stable surface before you light anything. A wide, flat rock is ideal. If you're on soft ground, press the canister down firmly and keep one hand near the pot handle while it heats.
In wind, canister stoves take a real hit. The PocketRocket 2 handles mild wind better than the ultralight BRS-3000T I used before it, but it's still not a wind-proof stove. Keep a windscreen close. Don't use a fully enclosed windscreen that wraps around the canister itself because heat buildup can become a pressure problem. Side screens that block wind but leave the canister ventilated are the right call. I carry a small folding aluminum screen that weighs almost nothing.
A flat rock, a windscreen, and ten seconds of setup separates a clean cook from a tipped pot and a wasted meal. The stove is never the problem. The setup is.
Step 5: Cook With Lids and Low Heat to Save Fuel and Improve Results
Two habits that instantly improve camp cooking: always cook with a lid, and turn the flame down once you hit a simmer. Cooking with a lid cuts your boil time and fuel burn noticeably because you're trapping heat. After the water is boiling and you've added your food, there's rarely a reason to keep the burner cranked. A low simmer is enough to rehydrate food, and it dramatically reduces scorching.
The PocketRocket 2 has good flame control for a backpacking stove. The valve has enough range that I can actually simmer, not just toggle between off and blowtorch. With cheaper burners I've owned, there's basically no middle ground. Fine flame control also means you can make scrambled eggs without ending up with rubber, which matters when you've woken up cold at 6am and eggs are the only morale on offer.
Pot material matters here too. A titanium pot heats fast but scorches quickly. Anodized aluminum is more forgiving for anything beyond boiling water. Hard-anodized aluminum pots are my preference for cooking actual food rather than just rehydrating. If you only boil water and pour it into bags, titanium is fine.
What Else Helps
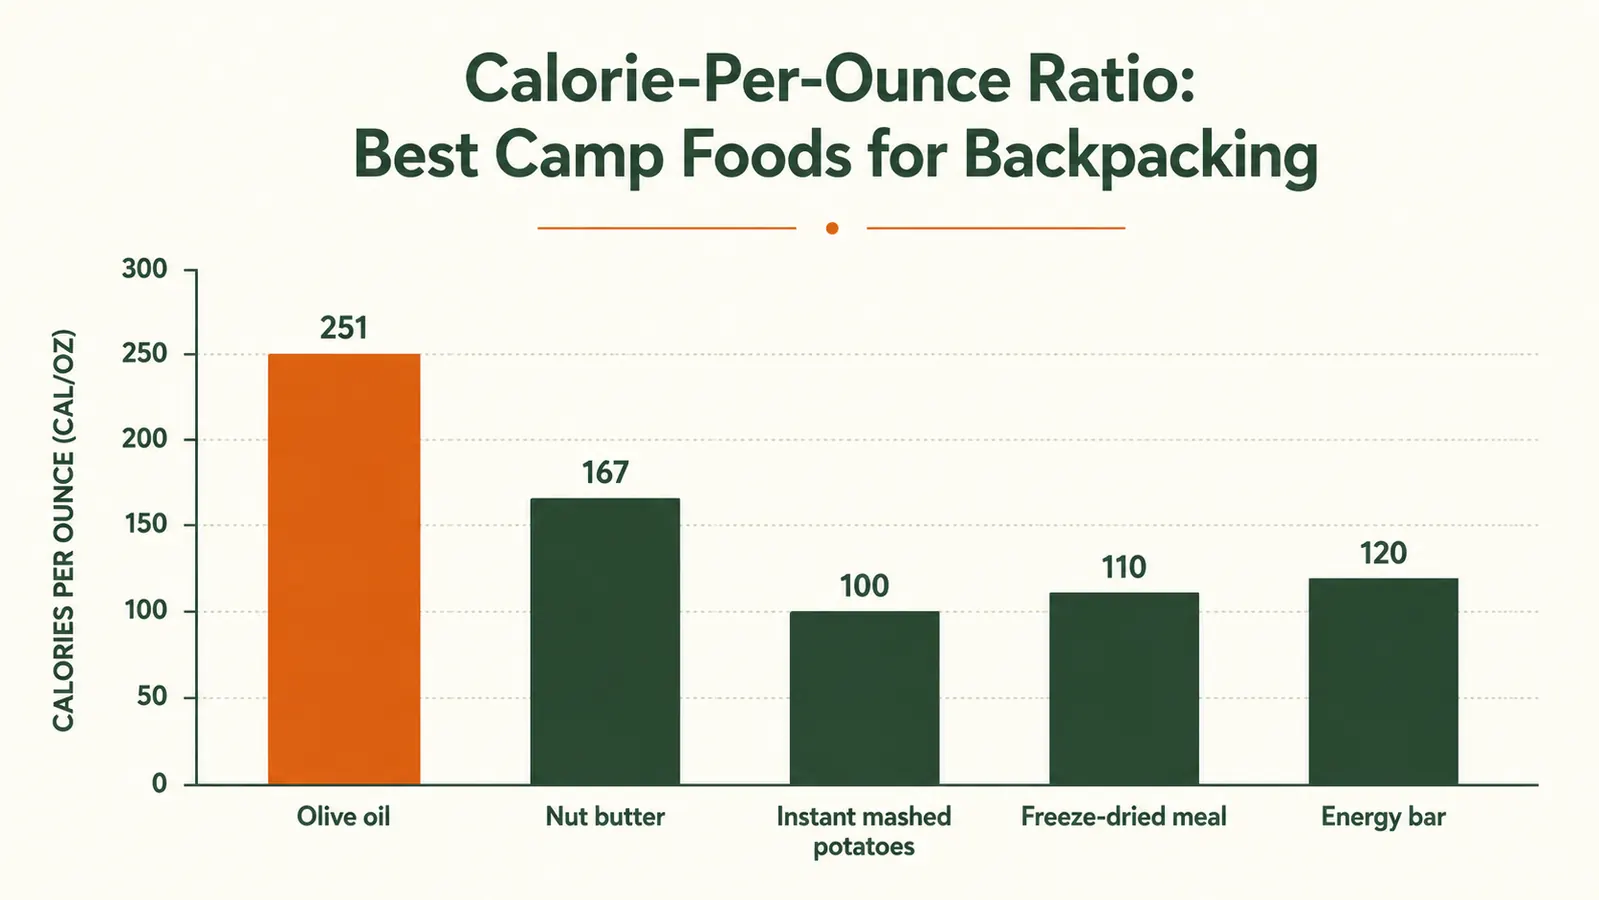
A few gear and habit additions that make the whole system work better together. A small silicone trivet or folded bandana keeps the hot pot from scorching your tent footprint or burning your hand when you set it down. A long-handled titanium spork handles both stirring and eating, eliminating a whole piece of gear. Bring a small bottle of olive oil. It adds calories, prevents sticking, and makes basically every savory camp meal taste better.
Pack your stove and canister in the same stuff sack or dry bag every time so you always know where it is, even by feel in the dark. Establish the habit of checking your igniter before a trip, not when you're hungry at dusk. The PocketRocket 2 doesn't have a built-in igniter, so carry a lighter and a backup (a firesteel works in wet conditions). Relying on one lighter is the kind of thing that feels fine until it isn't.
For a deeper look at the stove itself, including three-year wear-and-tear notes and a direct comparison with the BRS-3000T, check out the MSR PocketRocket 2 long-term review. If you're still deciding whether a canister stove is the right format for your kit, the 10 reasons canister stoves beat every other backpacking cooking option covers the full case.
The right stove makes every step in this guide easier
The MSR PocketRocket 2 is what I use on every trip. Rated 4.8 stars across 4,257 Amazon reviews. Boils fast, controls well, and fits in any kit without adding meaningful weight. If you're ready to stop eating sad camp food, this is the first piece.
Amazon Check Today's Price on Amazon →